Welded Joints aka “Weldments” is one of the process used to assemble the components/parts. In this blog you know about How to create “Miter Joint” in SOLIDWORKS.
“Miter Joint” is a joint made by cutting each of two parts to be joined, across the main surface, usually at a 45° angle, to form a corner, usually to form a 90° angle, though it can comprise any angle greater than 0°.
You can quickly create joint trims between different sized structural members when working with weldments, by either bisecting the joint angle or applying a flush trim.

Follow below step to know ‘How To Create Miter Joint Trim for Weldments’:
Step 1

Step 2

Step 3
Select the Bodies to be Trimmed.

Step 4

Toggle Equal angle miter to bisect the joint angle for the trim.

Step 5
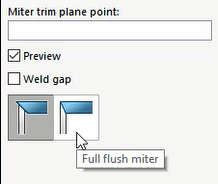
Toggle Full flush miter to apply whatever angle is required to make the adjoining edges flush with each other.

You can search all our posts on any social platforms by just searching for #igetit,
About i GET IT
i GET IT is our Tata Technologies eLearning solution designed to teach engineers how to be better in using today’s leading MCAD (Mechanical Computer Aided Design) applications and design skills. For more tech tips and in-depth eLearning for SOLIDWORKS, including this and new courses on other design solutions, please visit https://www.myigetit.com to explore more information. You can sign up and get FREE Subscription of our Newsletter and there are subscription plans to get access and start your upskilling journey! If you should have any questions, please reach out to iproducts@tatatechnologies.com or igetitsocial@tatatechnologies.com for help.


Leave a Reply